Made in Texas • Ships Uncompressed • CAL TB117-2013 Compliant
Acoustic Foam Panel Installation Guide
This guide will walk you through the different installation techniques, explain their pros and cons, and show how to place foam correctly for the best acoustic results.
9/15/20255 min read
Acoustic Foam Panel Installation Guide — Methods, Materials, and Best Practices
Acoustic foam panels are one of the most popular and affordable solutions for improving sound quality in studios, gaming setups, home theaters, and offices. But while foam is lightweight and easy to handle, the installation method you choose can make a big difference in performance, durability, and even your walls.
This guide will walk you through the different installation techniques, explain their pros and cons, and show how to place foam correctly for the best acoustic results.
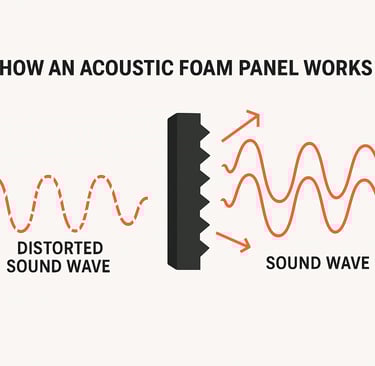
How Acoustic Foam Works (Quick Refresher)
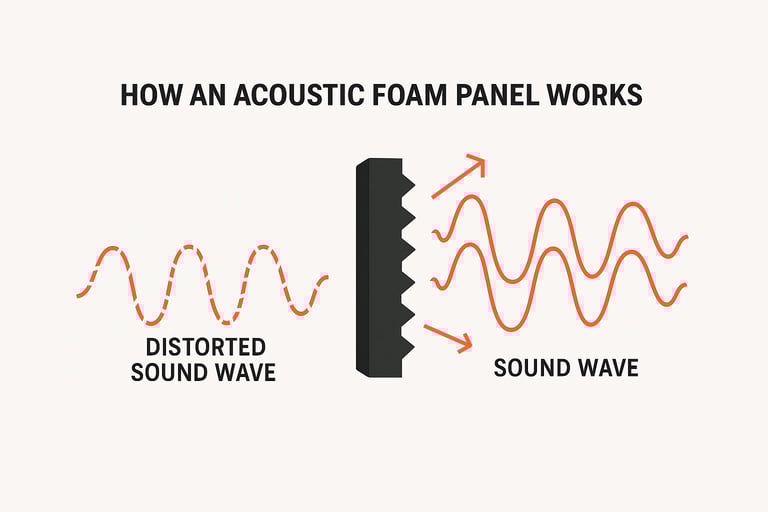
Acoustic foam doesn’t block sound — it absorbs it. The open-cell structure of polyurethane foam turns sound energy (especially mid- and high-frequency reflections) into heat through friction.
Flat Panels absorb sound hitting them head-on and reduce flutter echo.
Pyramid or Wedge Panels increase surface area and scatter reflections, improving clarity.
Foam Cubes & Bass Traps are placed in corners to control low-frequency buildup.
Panel Placement Basics
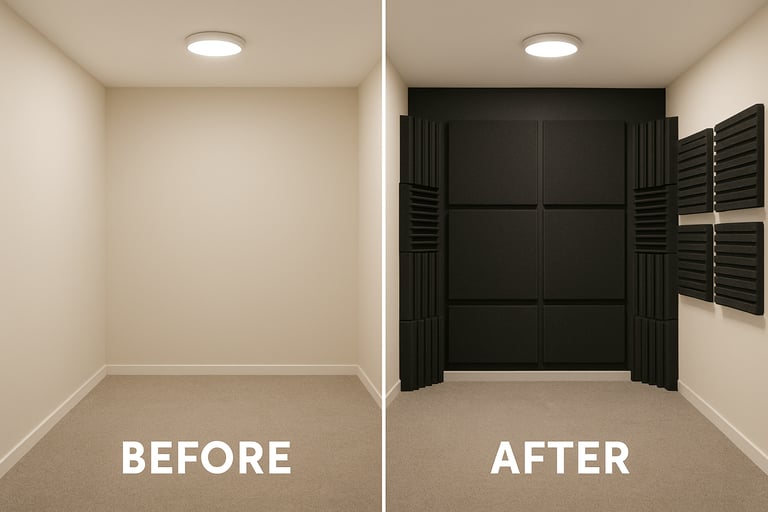
Proper placement is the key to getting the most out of your acoustic foam panels. Instead of randomly covering walls, focus on treating the first reflection points—the spots where sound bounces directly from your speakers to your ears. This usually includes the walls to your left and right, the wall behind your speakers, and sometimes the ceiling above your listening position. Adding panels in these areas reduces echoes and flutters, giving you clearer, more accurate sound. For even better results, place bass traps in the corners of the room, where low frequencies tend to build up.
First Reflection Points: Place panels where sound from speakers bounces directly to your ears (side walls, ceiling above listening position).
Behind the Mic / Vocalist: Helps eliminate flutter echo for clean recordings.
Corners: Best location for bass traps, since low frequencies collect here.
Back Wall: Prevents echoes and slap-back delay.
Installation Methods
Pre-requirements:
You will need a rag and 70% Isopropyl Alcohol. Use a decent amount of it to clean and wipe down the walls. Wait for it to evaporate before applying your adhesive of choice. This helps ensure that your acoustic foam panels secure to the wall, free of any dirt, debris, oils, etc.
Make sure you spot test an inconspicuous/hidden spot to make sure it does not react with your paint.
1. Double-Sided Foam Tape
How it works: Apply strips of heavy-duty, double-sided tape to the back of each panel and press it onto the wall.
It is recommended to go with a PE based double-sided tape with acrylic adhesive for best results with double sided tape. Any strong double-sided foam tape will work well.
Use double-sided tape along edges to secure. Measure the placement and plan out where you are placing your panels before beginning. Once you stick this tape on the wall, it will be difficult to move or reposition. Use 2" or more cut strips and place in each corner. Its recommended to start with securing only one corner, then slowly work on the other 3.
Pros:
Quick and simple.
No special tools required.
Clean look — panels sit flush on the wall.
Cons:
May damage paint or drywall when removed.
Less durable in humid environments.
Limited repositioning (once it sticks, it sticks).
2. Adhesive Spray
How it works: Spray the back of the foam panel (and optionally the wall) with acoustical adhesive spray. Press and hold for a few seconds. Spray evenly and cover the back evenly to prevent sides from rising.
Only recommended for permanent applications. Make sure you are in a well ventilated area and use an appropriate mask or respirator. Apply adhesive spray evenly across the entire backing. This has a short cure time, so place it quickly and position before holding firmly. You may use a rolling tool to evenly press the panel down, but its not required.
Pros:
Strong, long-term hold.
Easy coverage across the entire back surface.
Ideal for ceilings or large foam sheets.
Cons:
Nearly permanent — removing panels can tear foam drywall, or paint.
Messier than tape (overspray risk).
Requires ventilation during installation.
3. Removable Mounting (Velcro Strips / Command Strips)
How it works: Attach Velcro strips (hook and loop) or removable adhesive strips to the back of the panel and wall.
Very similar to double-sided tape, but less-permanent. This is recommended for apartments or stream setups that may move or change over time. This can still damage your walls paint. Using Velcro strips also allows you to have more leeway with placement.
Use 2" or more cut strips and place in each corner. Its recommended to start with securing only one corner, then slowly work on the other 3.
Pros:
Panels can be repositioned or swapped out.
Less wall damage compared to permanent adhesives.
Great for renters.
Cons:
Slight gap between panel and wall can reduce absorption efficiency.
Adhesive may weaken over time, especially with thicker/heavier foam.
4. Mechanical Fasteners (Nails, Pins, Staples)
How it works: Use finishing nails, push pins, or staples to secure panels directly to drywall or wooden backers.
Pros:
Quick and tool-free for light panels.
Allows panel removal without adhesive mess.
Works well if attaching panels to plywood or frames first.
Cons:
Leaves small holes in wall.
May not hold well for thicker or larger panels.
Less professional appearance unless framed.
5. Framing & Mounting
How it works: Mount panels inside lightweight wooden or metal frames that can be hung like pictures.
Pros:
Clean, professional look.
Easy to move panels without damaging walls.
Can combine different materials (foam + fabric).
Cons:
More DIY effort and cost.
Slightly reduces surface coverage.
Choosing the Right Method
For renters: Go with Velcro or removable strips.
For permanent setups: Adhesive spray or tape works best.
For pro studios: Frames or fabric-wrapped solutions look cleaner and last longer.
On ceilings: Use adhesive spray or mechanical fasteners for safety.
Pro Tips for Best Results
Mix absorption with bass traps: Foam panels are excellent for mids/highs, but combine them with corner traps for balanced sound.
Leave small gaps behind panels (optional): A 1–2 inch air gap can improve low-frequency absorption.
Check symmetry: Place panels evenly on left and right walls to maintain accurate stereo imaging.
Plan before sticking: Lay out your panels on the floor first to visualize the design.
Conclusion
Installing acoustic foam panels is simple, but the method you choose affects both performance and convenience. Foam offers unmatched affordability, customization, and ease of installation, making it one of the best ways to improve sound quality in any room.
By using the right combination of panels, bass traps, and installation methods, you’ll create a professional-sounding space without breaking the bank.


Sound Trap Acoustics
Premium acoustic foam panels made in the USA — shipped uncompressed for consistent quality and performance.
Support
Contact US
contactus@soundtrapacoustics.com
© 2025. All rights reserved.