Made in Texas • Ships Uncompressed • CAL TB117-2013 Compliant

Best Placement for Acoustic Foam Panels: Walls, Corners, and Ceilings
Buying acoustic foam panels is only half the battle. The real question is: Where should you place them for the best results? Placement makes all the difference. Put panels in the wrong spots and you’ll barely notice a change. Put them in the right spots and your room will instantly sound tighter, clearer, and more professional. This step-by-step guide will walk you through exactly where to install acoustic foam panels on your walls, corners, and ceiling for maximum effect.
9/15/20252 min read

Step 1: Understand Reflection Points
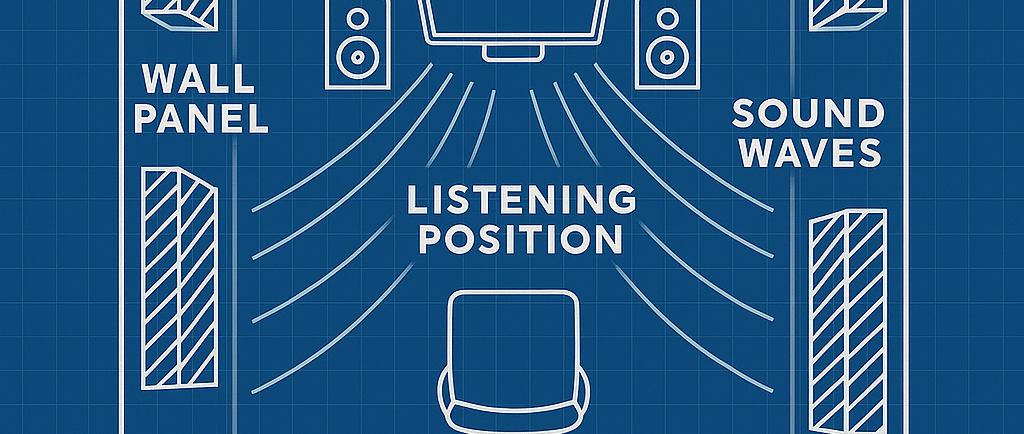
When sound leaves your speakers or mouth, it bounces off nearby surfaces before reaching your ears. These bounce spots are called reflection points.
On the side walls, they create echoes and comb filtering.
On the ceiling, they cause flutter echoes.
In the corners, low frequencies build up, creating boomy bass.
👉 Your goal with acoustic panels is to treat those reflection points so the sound reaching your ears is clean and direct.
Step 2: Treat the Walls
Start with the first reflection points on your side walls. A simple trick:
Sit where you normally listen or record.
Have someone move a mirror along the wall.
Wherever you see your speakers in the mirror — that’s a reflection point.
Place panels there.
This cuts down on early reflections and makes your sound clearer.
For small rooms, 4–8 panels on the walls (two on each side, plus some behind your setup) is usually enough.
Step 3: Treat the Corners
Corners are where bass frequencies build up. That’s why you’ll often notice a room sounds “boomy” or uneven at different spots.
Install bass traps (thicker foam panels) in the vertical corners of your room.
If possible, add them in ceiling-to-wall corners as well.
Even a couple of corner traps can dramatically improve low-end balance in your space.
👉 More detail here: Do Bass Traps Really Work? A Beginner’s Guide to Low-Frequency Control
Step 4: Treat the Ceiling
Don’t forget the ceiling — it’s one of the most overlooked reflection points.
Place 2–4 panels above your listening or recording position (called a “cloud”).
This prevents flutter echoes between the floor and ceiling.
For podcasters, gamers, and home studios, ceiling treatment can be the missing piece that makes recordings sound professional.
Step 5: Balance Coverage
The goal isn’t to cover every surface — you want a balanced mix of treated and untreated areas.
Spread panels across walls, corners, and ceilings for even absorption.
Avoid clustering all panels in one spot.
Think of your room like a puzzle — each piece of treatment works together to create balance.
Final Thoughts
The best placement for acoustic foam panels is:
Walls → first reflection points and behind speakers.
Corners → vertical corners with bass traps.
Ceiling → above your listening/recording area.
Start small, listen to the difference, and add panels as needed. With the right placement, even a handful of panels can transform the way your room sounds.
👉 Ready to set up your space? Explore our US-made acoustic foam panels — easy to install and designed for professional results.
Quick FAQs
Do I need to cover the entire wall with foam panels?
No. Covering 20–30% of your wall space is usually enough for noticeable results.
Should I put panels behind me or just around my setup?
Both. Panels behind you absorb reflections coming from the back wall, which improves clarity.
What about the floor?
Carpet or rugs usually handle floor reflections. Hard floors may benefit from extra absorption.
Sound Trap Acoustics
Premium acoustic foam panels made in the USA — shipped uncompressed for consistent quality and performance.
Support
Contact US
contactus@soundtrapacoustics.com
© 2025. All rights reserved.